The sonic gap between your practice room and a concert hall isn’t magic; it’s a predictable set of physical phenomena that you, as a performer, can understand and even manipulate.
- Small rooms create powerful low-frequency « room modes » that cause notes to either boom or vanish depending on your position.
- The balance between direct and reflected sound is governed by a « critical distance, » where moving your instrument or microphone just a few inches can dramatically alter the recorded tone.
- A great hall doesn’t add quality; it acts as a neutral amplifier, revealing the rich « harmonic complexity » of a superior instrument that a small, untreated room simply masks.
Recommendation: Instead of fighting your room, learn to identify its inherent acoustic behaviour, starting with controlling low-frequency modes and understanding your precise position within the space.
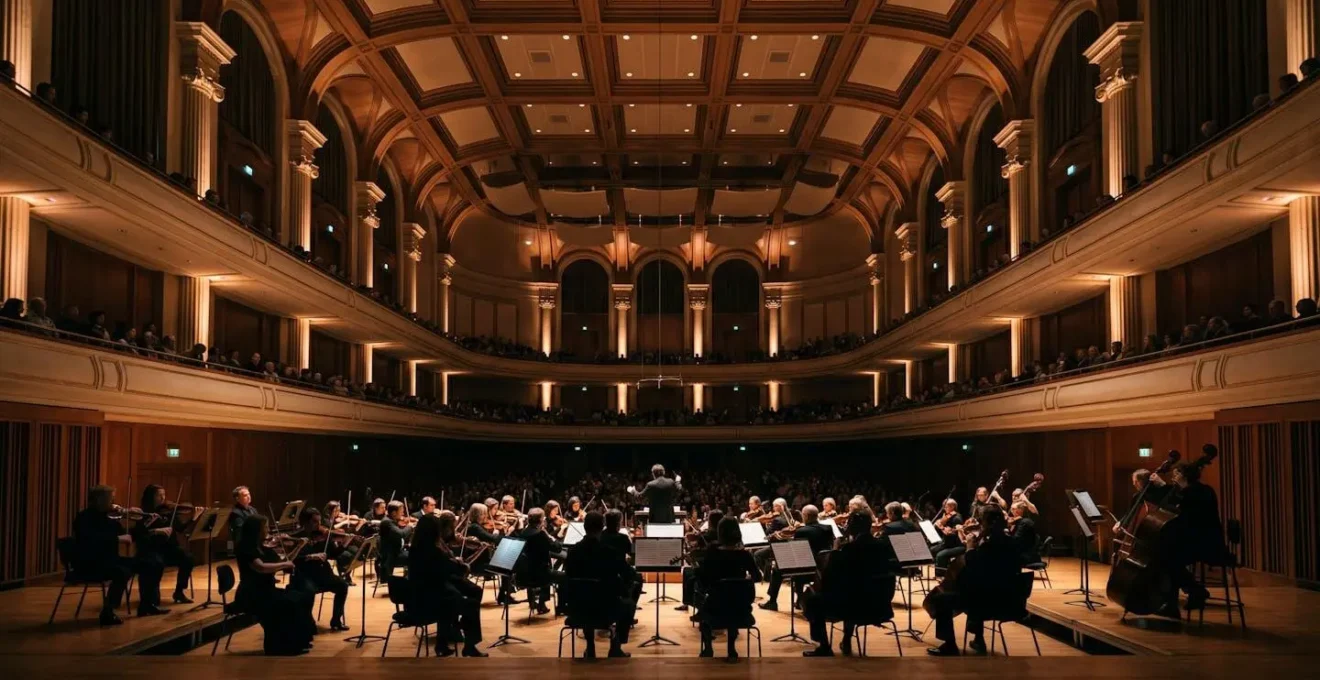
Every performer knows the feeling. In the practice room, your instrument feels constrained, certain notes leap out aggressively while others sound thin and lifeless. Hours are spent wrestling with intonation and dynamics. Then, you step onto the stage of a well-designed concert hall, play the first note, and suddenly your instrument breathes. The sound is rich, expansive, and effortlessly projects to the back of the hall. It feels like you’re playing an entirely different, superior instrument. This frustrating discrepancy is not a matter of subjective feeling or a lack of skill; it’s a direct result of architectural acoustics and the physics of sound in enclosed spaces.
The common advice is often to add soft furnishings or buy generic foam panels. While not entirely wrong, this approach barely scratches the surface. It treats the symptom—unpleasant reflections—without diagnosing the underlying cause. The truth is that the room itself is an instrument, one that interacts with your own in highly specific ways. Understanding this interaction goes beyond simple « dampening » and involves grasping concepts like standing waves, the delicate balance of sound reflection and diffusion, and even how the very materials of a hall are chosen to complement the harmonic series of an orchestra.
The key isn’t to replicate a concert hall in your spare bedroom. The goal is to understand the physical principles that make that hall work so well and apply them proportionally to your own space. This article demystifies the acoustics that separate the practice room from the performance stage. We will explore the specific phenomena—from booming bass notes caused by room modes to the subtle science behind tonewood—that dictate why your instrument’s voice changes so dramatically. By understanding this physics, you gain control, turning a frustrating acoustic environment into a predictable and workable tool.
This guide breaks down the core acoustic principles that every performer should understand. By exploring each concept, you will gain a clear picture of how sound behaves in different environments and how you can use that knowledge to your advantage.
Summary: The Physics of Sound for the Performing Musician
- Why Does Your Low E String Boom in One Corner but Disappear in Another?
- How to Position Acoustic Panels in a Small Room for Accurate Sound Without Over-Dampening?
- Living Room Practice vs Dedicated Studio: What Acoustic Trade-Offs Matter Most?
- The 12-Inch Microphone Shift That Transforms a Thin Recording into a Rich One
- When to Choose a Dry Acoustic: For Baroque Repertoire or Complex Contemporary Pieces?
- Why Does Alpine Spruce from Specific Valleys Produce Brighter Tones Than Generic Tonewood?
- The Balcony Sightline Nobody Checked Until Technical Rehearsal
- Why Does a £500 Violin Sound Different from a £50,000 Instrument with the Same Strings?
Why Does Your Low E String Boom in One Corner but Disappear in Another?
This common and frustrating phenomenon is the most direct experience a musician can have with room modes, also known as standing waves. In any enclosed space, sound waves reflect off surfaces. At specific frequencies, determined by the room’s dimensions (length, width, and height), the reflected wave perfectly aligns with the original wave. This creates points of massive pressure build-up (antinodes), where the note sounds incredibly loud or « boomy, » and points of cancellation (nodes), where the note seems to vanish entirely. Small, rectangular rooms are particularly susceptible to this.
Low frequencies have long wavelengths that are often exact multiples of a room’s dimensions. For a cellist or bassist, this means that notes like a low E or A can trigger these powerful modes, creating a completely unreliable acoustic environment. The perceived volume of a note can vary by 20dB or more simply by moving a few feet. This isn’t a flaw in your instrument or technique; it’s pure physics dictated by the architecture.
Consider a typical small recording room measuring 4m by 3m with a 2.5m ceiling. This space will produce fundamental axial modes at approximately 42.9 Hz, 57.2 Hz, and 68.6 Hz. If you play a bass note near 57 Hz, its volume will be dramatically exaggerated or cancelled depending on where you and your instrument are located relative to the room’s centre and corners. Understanding this allows you to either move your practice position or strategically place bass traps to mitigate the issue, transforming the room from an adversary into a predictable space.
How to Position Acoustic Panels in a Small Room for Accurate Sound Without Over-Dampening?
The reflexive solution to poor room acoustics is often to cover the walls in absorptive panels. However, this can lead to an acoustically « dead » space that feels unnatural and lacks the subtle reflections that provide crucial feedback to a performer. The professional approach is not total absorption, but strategic control. A highly effective and efficient method for this is the Live End Dead End (LEDE) concept, which balances absorption and reflection to create an accurate yet lively listening environment.
The principle is simple: you create a « dead end » where the sound originates and a « live end » where the listener sits. This involves placing absorptive panels on the wall behind your monitors or in the direction you project your instrument’s sound. This treatment absorbs the critical early reflections that can muddy the direct sound and cause phasing issues. Conversely, the rear half of the room is left more reflective or is treated with diffusers, which scatter sound rather than absorbing it. This preserves a sense of space and natural ambience, preventing the sound from becoming dry and lifeless.
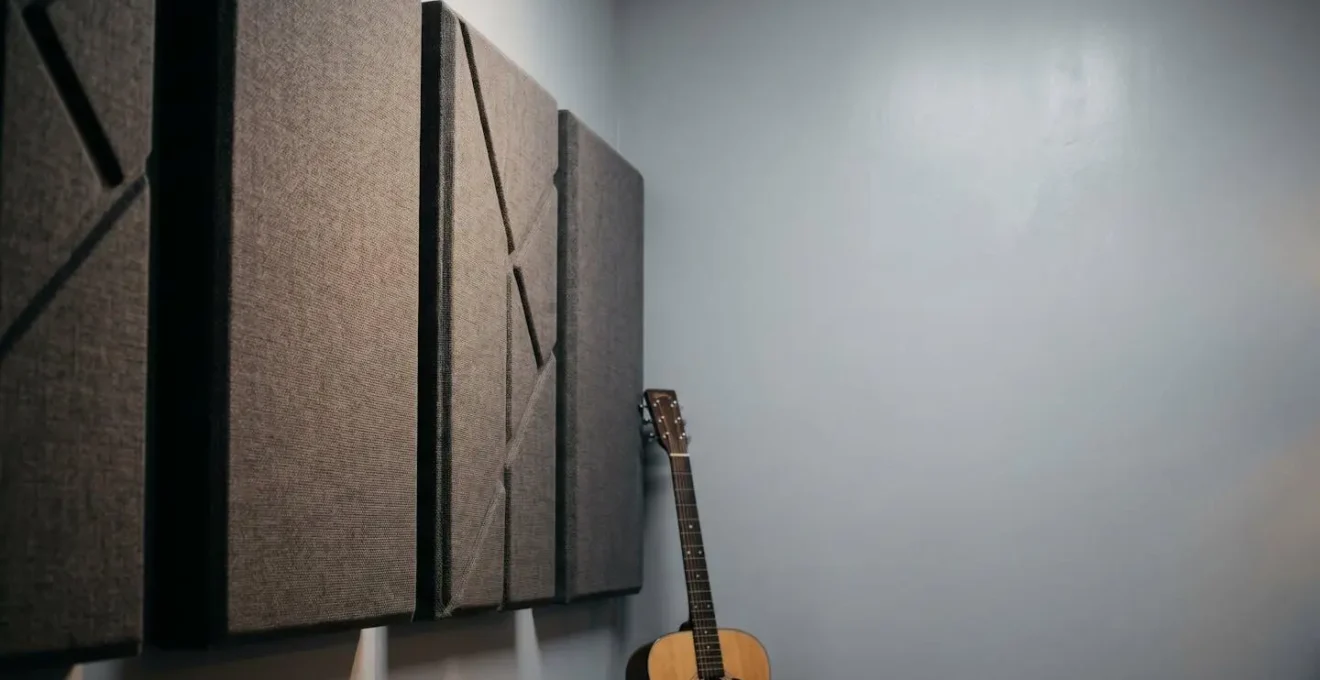
As the image illustrates, this approach creates distinct acoustic zones. The absorptive front section ensures clarity from the source, while the reflective back section provides the performer with the subtle, diffuse reverberation needed for a natural playing experience. This is far more effective than randomly placing panels and avoids the common mistake of over-dampening, which can be just as detrimental as having no treatment at all.
Action Plan: Implementing a Basic LEDE Setup
- Baseline Coverage: Aim to cover 20-30% of the total wall and ceiling surface area with acoustic treatment. This is a solid starting point for most domestic rooms.
- Create the « Dead End »: Place your primary sound absorption panels in the front half of the room, focusing on the first reflection points on the side walls and ceiling relative to your listening position.
- Preserve the « Live End »: Leave the back half of the room largely untreated or use diffusers to scatter sound and maintain a natural sense of ambience and space.
- Tackle the Lows: Position dedicated bass traps in the corners of the room, where low-frequency energy (room modes) naturally accumulates.
- Avoid the Centre: Never position your listening chair or primary practice spot exactly at the halfway point of the room’s length or width, as this is often a point of significant bass cancellation.
Living Room Practice vs Dedicated Studio: What Acoustic Trade-Offs Matter Most?
Many musicians practice in a multi-purpose living space rather than a dedicated, acoustically treated studio. While a studio offers control, a typical living room presents a unique set of acoustic trade-offs that are not entirely negative. The key difference lies in the balance between absorption and diffusion. A studio is often designed for high absorption to create a neutral canvas for recording. A living room, with its irregular shapes, furniture, bookshelves, and varied surfaces, is an environment rich in natural diffusion.
This diffusion, the scattering of sound waves in many directions, can be highly beneficial. Instead of a few strong, coherent reflections (flutter echo) you might get from parallel bare walls in an untreated room, a furnished living room breaks up sound energy. This creates a complex, dense, and short reverberation that can feel more natural and pleasant than an overly dry studio. Bookshelves, in particular, act as excellent, if unintentional, diffusers. The primary trade-off is predictability. While the living room’s acoustic signature might be pleasant, it is also complex and uncontrolled, with potential for odd resonances from furniture or glass surfaces.
A dedicated studio reverses this: it prioritizes control over natural complexity. The goal is to eliminate the room’s character as much as possible to capture the pure sound of the instrument. However, for a performer, this can be a double-edged sword. As the Sound On Sound editorial team notes when discussing a well-treated room, « The main part of the room is now nicely controlled, if a bit on the ‘live’ side, and the diffusers ensure excellent intelligibility of speech: a sure-fire sign of good acoustic control. » The goal isn’t deathly silence, but intelligibility. A living room can sometimes offer this naturally, while a poorly treated studio can sound lifeless and uninspiring, robbing the performer of essential acoustic feedback.
The 12-Inch Microphone Shift That Transforms a Thin Recording into a Rich One
When recording an instrument, tiny changes in microphone placement can yield enormous differences in the final sound. This is governed by the concept of critical distance. Critical distance is the specific point in a room where the energy of the direct sound from the instrument is equal to the energy of the reflected sound from the room’s surfaces. Placing a microphone inside this distance captures a sound dominated by the instrument itself (direct sound). Placing it outside captures a sound dominated by the room’s character (reverberant sound).
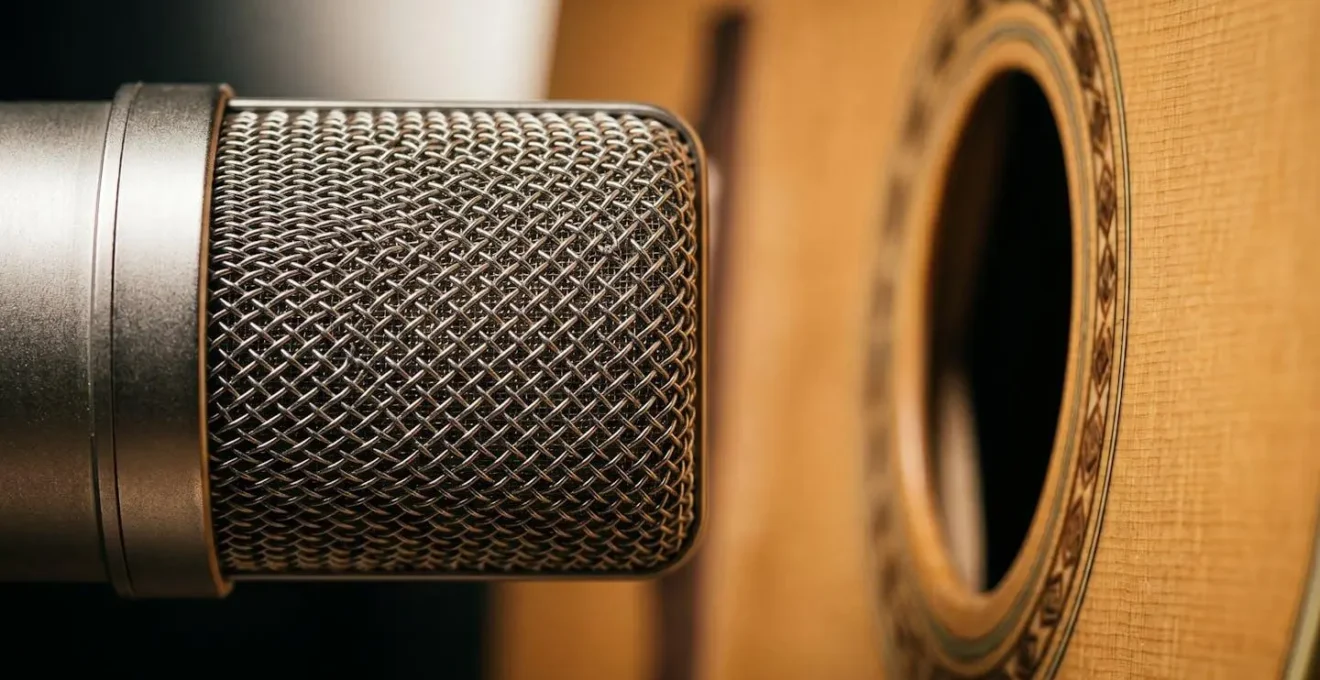
This principle explains why a 12-inch (or roughly 30 cm) shift can be so transformative. In many home studio environments, the critical distance is surprisingly close to the source. Moving a microphone from 6 inches away to 18 inches away can be the difference between a dry, intimate, and bass-heavy sound (due to proximity effect) and a more open, airy sound that includes the room’s natural reflections. For vocalists, acoustic research on home recording environments shows that the sweet spot is often between 30-60 centimeters. This range is a constant negotiation between clarity and ambience.
A thin recording is often the result of placing the mic too far from the source in a poor-sounding room, capturing a high ratio of undesirable reflections. Conversely, a rich, balanced recording is often achieved by working just inside the critical distance, capturing the full detail of the instrument while allowing just enough of the room’s character to bleed in. The « 12-inch shift » is therefore not a magic number, but a process of listening intently while moving the microphone across that critical distance threshold to find the perfect balance between the instrument and the space.
When to Choose a Dry Acoustic: For Baroque Repertoire or Complex Contemporary Pieces?
The ideal acoustic is not a universal constant; it is deeply intertwined with the musical repertoire being performed. The choice between a « dry » acoustic (short reverberation time, high clarity) and a « wet » or « reverberant » one is a crucial artistic decision. A dry acoustic is paramount for music that relies on intricate detail, rapid articulation, and complex contrapuntal lines. For this reason, much Baroque music, with its fast-moving harpsichord passages and interwoven melodic voices, thrives in a clearer, less reverberant space where every note can be distinctly heard.
Similarly, many complex contemporary and atonal pieces demand extreme clarity to be understood. A long reverberation time would blur their complex harmonic structures and rhythmic patterns into an unintelligible wash of sound. Conversely, Romantic and Impressionistic music often benefits from a more generous acoustic. The legendary acoustician Leo Beranek observed this synergy perfectly:
The thrill of hearing Bach’s B minor Mass, Beethoven’s Ninth Symphony or Mahler’s Eighth Symphony is not only determined by the quality of the orchestra and interpretation of the conductor, but is enhanced immeasurably by the dynamic response of the concert hall.
– Leo Beranek, What makes the perfect acoustic, according to science – Classic FM
This historical awareness is not new. Composers have intuitively designed music for specific spaces for centuries. Wagner designed his own opera house at Bayreuth to create the perfect blended, immersive sound for his epic works, while Gabrieli composed for the vast, multi-second reverberation of St Mark’s Basilica in Venice, using it as a compositional element. This demonstrates that the « right » acoustic is one that serves the music’s intent, whether that is the forensic clarity needed for a contemporary piece or the majestic bloom required for a romantic symphony.
Why Does Alpine Spruce from Specific Valleys Produce Brighter Tones Than Generic Tonewood?
The material of an instrument is the very origin of its sound, and not all woods are created equal. The legendary reputation of Alpine spruce, particularly from specific regions like the Fiemme Valley in Italy, is not myth; it is rooted in measurable physical properties shaped by a harsh environment. The primary factor is the wood’s exceptionally high stiffness-to-weight ratio. As luthier Andrew Lukonis explains, « Spruce has a very high stiffness-to-weight ratio, meaning that even though it is light and must be carved very thinly to make a violin, it still remains very strong. » This allows the top plate of an instrument to be both highly resonant and structurally sound.
Trees grown at high altitudes just below the tree line face cold temperatures and short growing seasons. This forces them into a slow, consistent growth pattern, which results in denser wood with very tight, evenly spaced growth rings. This physical structure directly impacts its acoustic properties. The denser the wood, the faster the speed of sound travels through it. This high velocity of sound transmission across the grain is what produces the bright, clear, and responsive tone that luthiers seek. It allows the instrument to « speak » quickly and project with a brilliant character that can cut through the sound of an orchestra.
This tradition is exemplified by the Fiemme Valley, which has been the premier source of tonewood for centuries. Its spruce was used by Antonio Stradivari for his iconic violins and is still used today for the soundboards of world-class Fazioli pianos. The consistent, slow-growth wood from this specific environment provides a material that can vibrate freely and efficiently, translating the player’s energy into a rich and projective sound. The bright tone isn’t a magical property, but a direct consequence of the wood’s life story, encoded in its cellular structure.
The Balcony Sightline Nobody Checked Until Technical Rehearsal
In concert hall design, what you see is often directly related to what you hear. A compromised sightline, particularly for seats tucked deep under a balcony overhang, is a strong indicator of a compromised « sound-line. » This phenomenon is known as acoustic shadowing. High-frequency sound waves, which are responsible for the clarity, brightness, and articulation of music, travel in relatively straight lines. A deep balcony overhang can physically block the direct path of these waves from the stage to the listener, creating an acoustic « shadow. »
Listeners in these seats will perceive the sound as muffled, distant, and lacking in detail. While they may still hear the low and mid-range frequencies, which have longer wavelengths and can diffract (bend) around obstacles more easily, the crucial high-frequency information is lost. This is why a seat with a perfect, unobstructed view of every musician on stage often provides the most balanced and clear sound.
The famous case of London’s Royal Albert Hall provides a classic example. While its gallery seats offer clear views, the sound was historically plagued by a severe echo from the high, domed ceiling. Seats under the balcony overhang suffered from a combination of this echo and acoustic shadowing. The iconic « mushrooms » (fibreglass acoustic diffusers) installed in the 1960s were designed to solve this. They work by scattering sound energy before it can form a coherent, powerful echo, while also redirecting some of that scattered energy into the acoustically shadowed areas. This case demonstrates that even in the most prestigious halls, the physical relationship between the source, the listener, and the architecture is a delicate balance that can easily be disrupted.
Key takeaways
- A room’s dimensions create « room modes, » which cause specific bass notes to become excessively loud or disappear entirely.
- The balance between an instrument’s direct sound and the room’s reflections is determined by « critical distance, » a key factor in microphone placement.
- Excellent acoustics do not add quality but reveal it, by giving the complex harmonics of a superior instrument space to develop.
Why Does a £500 Violin Sound Different from a £50,000 Instrument with the Same Strings?
While strings and player skill are factors, the vast price difference between a student violin and a master-built instrument reflects a profound divergence in their ability to produce harmonic complexity. A concert hall acts as a neutral, high-fidelity amplifier: it can only amplify what it is given. A £500 student instrument, often made with thicker, less resonant woods, produces a strong fundamental note but a relatively simple and weak series of overtones. In a small practice room, this may be less apparent, but in a great hall, its sonic limitations are laid bare.
A £50,000 instrument, crafted from select, aged tonewood and meticulously graduated by a master luthier, is an engine for generating an incredibly rich and dense spectrum of harmonics. When a note is played, it’s not just the fundamental frequency you hear, but a whole series of higher-frequency overtones that give the instrument its unique timbre, warmth, and carrying power. The long reverberation time of a concert hall gives these complex harmonics the time and space to « bloom » and decay naturally, creating the perception of a rich, full, and enveloping sound.
This isn’t merely conjecture. As a recent study published in Nature confirms, a concert hall’s primary role is to enhance the usable dynamic range and reveal the inherent quality of the sound source. The research demonstrates that a great hall amplifies precisely what it receives. It allows a professional instrument to be played from a whispering pianissimo (ppp) to a thunderous fortissimo (fff) without the tone breaking or becoming harsh. A student violin simply lacks the physical capacity to produce the harmonic richness and dynamic control that a concert hall is built to showcase. The hall doesn’t make the cheap violin sound good; it ruthlessly exposes its simplicity.
By understanding the physics of room modes, critical distance, and harmonic amplification, you move from being a victim of your environment to an informed architect of your own sound. The next logical step is to apply this knowledge to actively diagnose and improve your primary practice space.