
The visual gulf between competent modern woodwork and an 18th-century masterpiece is not a matter of secret techniques, but of mastering the underlying science of light, materials, and geometry.
- A hand-planed surface is not just smoother; it is optically different, creating a depth and life (chatoyancy) that sanding destroys.
- Authentic finishes like shellac are chosen for their specific refractive index, which interacts with light in a way modern lacquers cannot replicate.
Recommendation: Stop chasing an arbitrary grit number and start treating surface preparation, joinery, and finishing as exercises in controlling the physical and optical properties of your materials.
Many skilled woodworkers stand before a piece of Georgian furniture in a museum like the V&A and feel a sense of profound inadequacy. Your own work is precise, functional, and well-made. The joints are tight, the surfaces are smooth. Yet, it lacks a certain vitality, a depth and resonance that makes the 18th-century original seem almost alive. You follow the common advice: you sand to ever-finer grits, you apply modern, durable finishes, and you use the best machinery money can buy. Still, the gap remains.
The frustration is understandable, but it is rooted in a fundamental misunderstanding. The artisans of the Georgian period were not magicians; they were masters of material science. They understood, intuitively and practically, principles that we now neglect. They knew that a flawless surface was not about abrasion, but about the clean severing of wood fibres. They knew that a finish was not just a protective layer, but an optical lens that worked in concert with the wood beneath it.
The key to bridging this gap lies not in better machines or more sanding, but in a deeper, almost scientific, appreciation for how these historical methods manipulate light, structure, and time. This is not about nostalgia; it is about rediscovering the physics behind true mastery. This article will deconstruct the core principles that separate amateur polish from museum-quality patina, focusing on the science that a modern workshop often overlooks.
By exploring the tangible differences in surface preparation, finishing chemistry, joinery aesthetics, and material selection, you will gain a new framework for evaluating your own work. The following sections provide a conservator’s perspective on these critical elements.
Summary: Why Does Your Joinery Look Amateur Next to 18th-Century Originals in the V&A?
- Why Does a Hand-Planed Surface Reflect Light Differently Than Machine-Sanded Wood?
- How to Achieve a Mirror Finish with a Hand Plane After 50 Hours of Practice?
- Shellac vs Water-Based Lacquer: Which Finish Matches Georgian Furniture Patina?
- The Filler Shortcut That Makes Oak Projects Look Like Cheap Pine Within 2 Years
- When to Apply Final Lacquer Coats: After Heating Season or During Summer Humidity?
- Why Does Hand-Cut Dovetailing Look Different from CNC-Routed Joints Even to Untrained Eyes?
- Reclaimed Pitch Pine vs New Douglas Fir: Which Performs Better for Load-Bearing Furniture?
- Why Are Georgian Furniture Techniques Appearing in Cutting-Edge London Design Studios?
Why Does a Hand-Planed Surface Reflect Light Differently Than Machine-Sanded Wood?
The single greatest differentiator between a historical and a modern finish lies at the microscopic level. The modern workshop’s reliance on sanding, even to an exceptionally high grit, is an act of abrasion. It scratches and tears at the wood fibres, creating a fuzzed, broken, and matted surface. While this feels smooth to the touch, it is optically dead. Light hitting this surface is diffused and scattered in random directions, resulting in a dull, flat appearance.
A finely set and properly sharpened hand plane, by contrast, performs an act of severing. The blade slices cleanly through the wood fibres, leaving behind a series of contiguous, unbroken micro-facets. These facets act like microscopic prisms. Light is reflected in a coherent, directional manner, creating a visual effect of depth and movement known as chatoyancy. This is the shimmering, liquid quality you see in figured sycamore or quartersawn oak, an effect that sanding completely obliterates. To appreciate the physics, see how light interacts with the wood’s structure in this image.
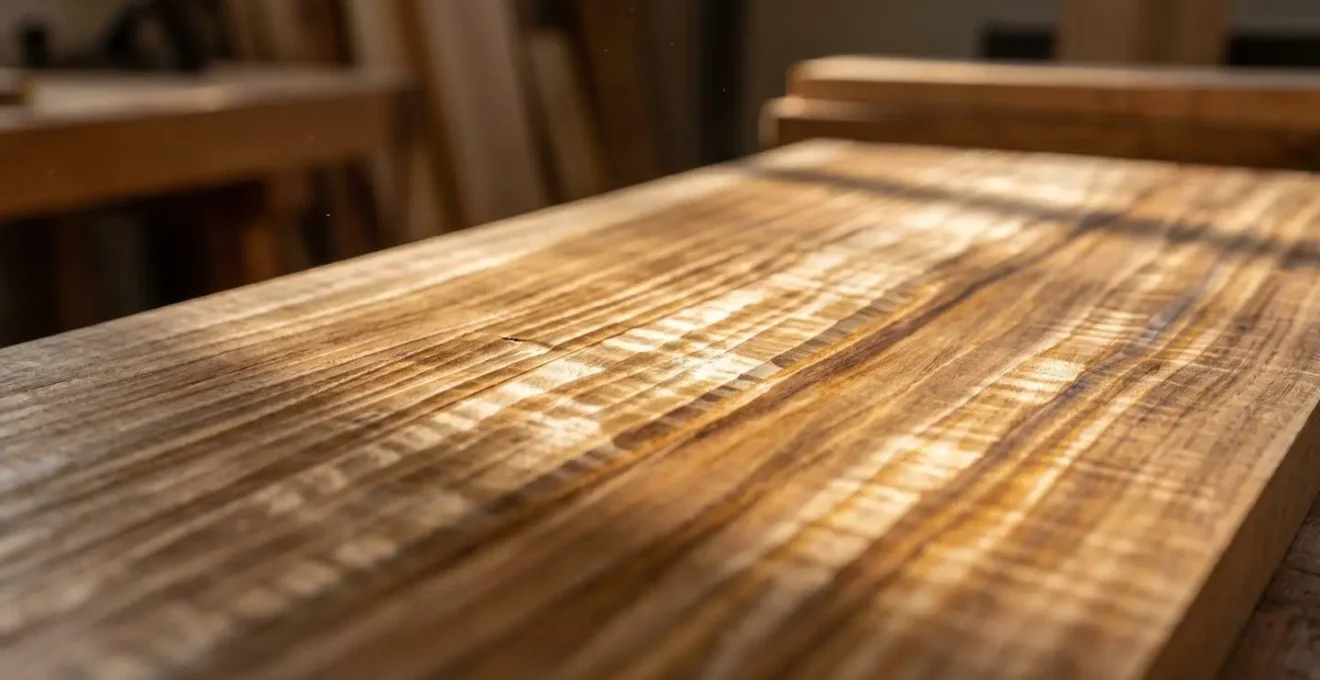
This is not a matter of opinion but of measurable surface topography. Research confirms this distinction; according to an analysis of wood surface roughness, hand-planed surfaces have significantly lower roughness (Ra) values than even finely sanded ones. A sanded surface is a field of microscopic hills and valleys that trap light; a planed surface is a mirrored plane that reflects it with brilliance and life.
How to Achieve a Mirror Finish with a Hand Plane After 50 Hours of Practice?
Understanding the theory of a planed surface is one thing; executing it is another. Achieving a finish straight from the plane that requires no further refinement is a benchmark of high-level craftsmanship. It is a skill that demands discipline, particularly in the non-negotiable area of blade sharpening. A blade that cannot shave the hair from your arm will not sever wood fibres cleanly; it will tear them. The « 50 hours of practice » is not an arbitrary number; it represents the time required to master blade preparation and the physical act of planing.
The process is systematic, moving from coarse levelling to the final, gossamer-thin shavings. Each step builds upon the last, with the ultimate goal of producing a surface that is geometrically flat and optically perfect. The final pass with a well-tuned smoothing plane or a card scraper should leave a surface that feels like glass and reflects light with perfect clarity. This is the true foundation upon which a historical finish is built. Anything less is a compromise that will be visible in the final result.
Action plan: Achieving a glass-like hand-planed surface
- Sharpening: The plane iron’s back and bevel must be polished to a mirror finish, progressing through stones or compounds to at least 0.5 micron (an 8000+ grit equivalent).
- Chipbreaker Setting: Position the chipbreaker within 0.5mm of the cutting edge. This critical step pre-stresses the wood fibres just ahead of the cut, preventing tear-out.
- Blade Camber: Hone a very slight arc, or camber, onto the blade’s edge. This prevents the corners of the blade from digging in and leaving tracks (« plane marks »).
- Reading the Grain: Always plane with the grain. Learn to read the direction of the wood fibres and reverse your direction as needed to avoid catastrophic tear-out.
- Final Scraper Pass: After the final planing, a pass with a card scraper, holding a freshly burnished burr, takes a whisper-thin shaving that creates the ultimate glass-like finish without any abrasion.
This process is not a shortcut; it is the distilled practice of centuries of master craftsmen. It replaces the brute force of sanding with the finesse of a perfectly sharpened and set tool, delivering a superior result.
Shellac vs Water-Based Lacquer: Which Finish Matches Georgian Furniture Patina?
Once a perfect surface is achieved, the choice of finish becomes critical. A modern water-based lacquer is a film of plastic. It sits on top of the wood, creating a clear but ultimately lifeless barrier. It may be durable, but it is optically inert. A historical finish like shellac, however, is fundamentally different. It is not a barrier so much as an optical enhancement.
The crucial scientific principle here is the refractive index. This measures how much a material bends light. Shellac has an almost perfect refractive index for wood, creating a sense of depth and warmth that makes the grain appear to leap out. According to conservation science data from the Museum of Fine Arts, Boston, shellac has a refractive index of 1.516, which is significantly higher and more sympathetic to wood than the acrylic resins found in many modern varnishes. It acts like a lens, amplifying the chatoyancy you worked so hard to create with the hand plane.
V&A Museum Conservation Principles
The approach of major institutions like the Victoria and Albert Museum provides a clear guide. As highlighted in their published conservation principles, their specialists prioritize treatments that are reversible and use stable, historically-appropriate materials. Shellac is a cornerstone of this philosophy. Its reversibility—the ability to be removed with alcohol without damaging the original piece—is paramount for long-term preservation and research. This principle of doing no irreversible harm is a standard that separates professional restoration from amateur repair.
Furthermore, shellac ages gracefully. It develops a patina, a warm amber glow and a network of fine craquelure that adds to the character of a piece. A plastic finish, on the other hand, fails catastrophically—it can yellow, craze, or delaminate, looking shabby rather than distinguished. Choosing shellac is choosing a finish that understands and complements both the wood and the passage of time.
The Filler Shortcut That Makes Oak Projects Look Like Cheap Pine Within 2 Years
In the pursuit of a flawless surface, the temptation to use commercial wood fillers to correct small gaps or defects is strong. This is a fatal error in high-quality work. A filler is a shortcut that telegraphs itself over time, ultimately degrading the appearance and integrity of the piece. The fundamental problem is that filler and wood are two different materials that respond to environmental changes at different rates.
Wood is hygroscopic; it constantly absorbs and releases moisture from the atmosphere, causing it to expand and contract. An epoxy or acrylic-based filler does not. Within a few seasons, a microscopic line will appear around the filled area. Worse, the filler does not take a finish in the same way as the surrounding wood. A filled spot in oak will always look like a dead, flat patch, interrupting the natural grain and chatoyancy of the surface. Over time, as the wood develops its natural patina, the filled area remains static, becoming increasingly obvious and unsightly.
The historical solution is patient and precise joinery that requires no filler. For unavoidable small repairs, craftsmen would create their own filler from shellac and sanding dust from the same piece of wood. This ensures a perfect color match and a material that responds to the finish in a similar manner. The core principle, as articulated by bodies like the American Institute for Conservation, is that structural and surface integrity should be achieved through craftsmanship, not cosmetic concealment. Using a generic filler is an admission of failure at the joinery stage.
When to Apply Final Lacquer Coats: After Heating Season or During Summer Humidity?
The application of a finish like shellac is a chemical process sensitive to its environment. Many artisans, focused on the mechanics of application, neglect the critical factors of temperature and relative humidity. Applying a shellac finish in the wrong conditions can ruin weeks of careful surface preparation. The ideal environment for applying shellac is one of a moderate, stable temperature and, most importantly, low humidity.
The solvent for shellac is denatured alcohol, which evaporates very quickly. In a humid environment, this rapid evaporation causes a sharp drop in the temperature of the surface being finished. This can cause moisture from the air to condense directly onto the wet shellac. As the MFA CAMEO database notes, this trapped moisture is the cause of « blushing »—a milky, white haze that becomes trapped within the finish, obscuring the grain and ruining the clarity of the coat.
Therefore, the timing of your finishing is a strategic decision. Applying final coats during a humid summer is fraught with risk. The ideal time is often in the autumn or winter, after the central heating has been on for some time, creating a dry and stable indoor atmosphere. Working in a climate-controlled space is the professional standard, but for the smaller workshop, simply paying attention to the seasonal environment is a crucial step towards a flawless, crystal-clear finish. Rushing to apply a finish in damp conditions is a recipe for disappointment.
Why Does Hand-Cut Dovetailing Look Different from CNC-Routed Joints Even to Untrained Eyes?
The difference between a hand-cut dovetail and a machine-cut one is not just a matter of romanticism; it is a question of geometry and visual rhythm. Even an untrained eye can often sense the difference. A CNC-routed joint is geometrically perfect but visually sterile. The pins and tails are uniform, the spacing is mathematically exact, and the inside corners have a small radius left by the diameter of the router bit—the infamous « dog-bone » fillet that is a dead giveaway of machine production.
A hand-cut joint, conversely, is governed by human ergonomics and a sense of geometric harmony. The proportions of the pins to the tails are chosen by eye for aesthetic balance, not machine efficiency. There are subtle, rhythmic variations in the spacing and angles that give the joint a living quality. The baseline, scribed with a knife, is often left visible as a testament to the process—a crisp, deliberate mark of craftsmanship. The inside corners are perfectly sharp, cut with a chisel, creating a level of crispness a rotating bit cannot achieve.
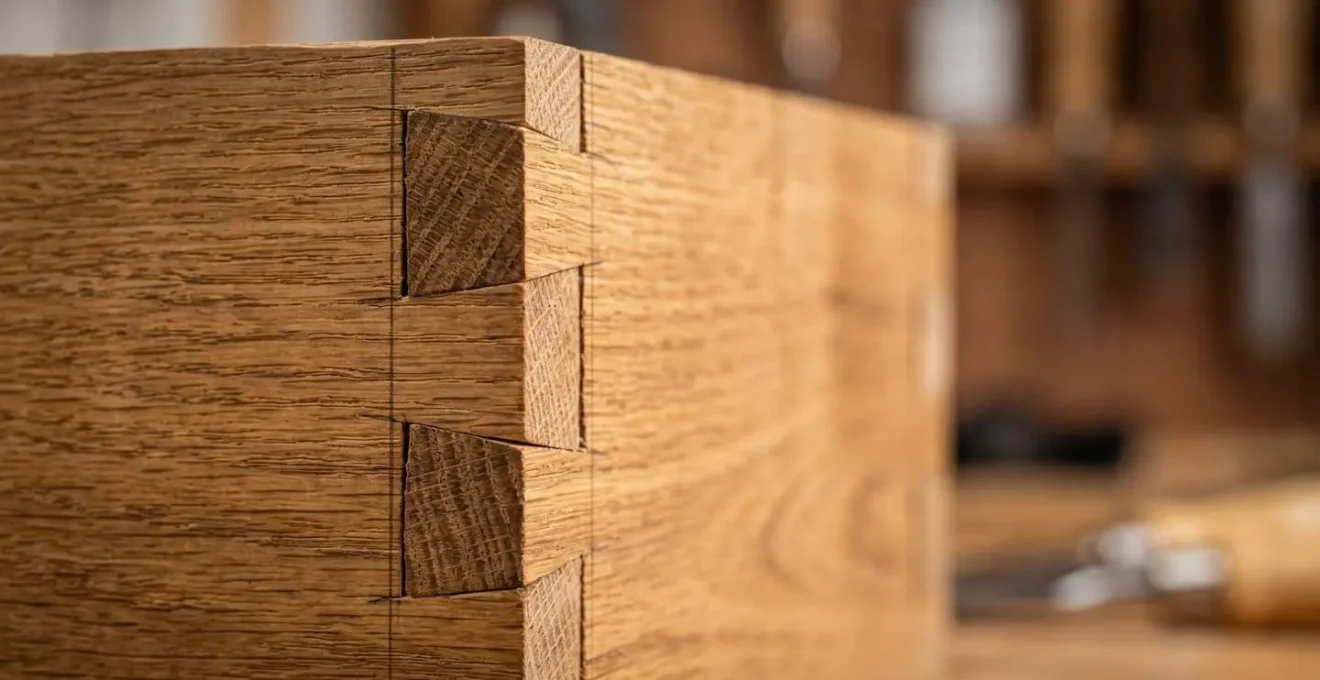
As noted in guides on 18th-century furniture construction, the work of masters like Chippendale was defined by this balance and proportion in their joinery. It wasn’t about being perfect in a sterile, mathematical sense. It was about creating a visual story of how the piece was made, where the hand of the maker is present and celebrated, not erased. This human element is what a machine, by its very nature, cannot replicate.
Reclaimed Pitch Pine vs New Douglas Fir: Which Performs Better for Load-Bearing Furniture?
The choice of timber is as fundamental as the choice of joint. A design executed in a mediocre material will always be a mediocre piece. For work inspired by historical precedents, using reclaimed timber is not an affectation; it is a structural and aesthetic necessity. A piece of reclaimed, old-growth pitch pine is a fundamentally different material from a piece of new, fast-grown Douglas fir from a modern timber yard.
The primary difference lies in the density of the growth rings. Old-growth timber, harvested from virgin forests, grew slowly in a competitive environment. This resulted in wood with incredibly tight, dense growth rings. This density provides superior stability, strength, and resistance to denting, making it ideal for load-bearing elements like table legs or cabinet carcases. Modern, commercially grown timber is designed to grow fast, resulting in wide, soft growth rings that are less stable and more prone to movement and damage.
Furthermore, reclaimed wood has had decades, or even centuries, to acclimate. It has finished moving, shrinking, and twisting. It is a known quantity, a stable material that will hold its shape. A new piece of Douglas fir, even if kiln-dried, still contains internal stresses and will continue to move as it settles into the equilibrium of your workshop and its final home. For work that is meant to last for generations, starting with material that has already stood the test of time is the only logical choice.
Key takeaways
- The ‘life’ in historical furniture comes from controlling light, not just smoothing wood. A hand plane creates optical facets; sandpaper creates a dull, abraded surface.
- Authentic finishes like shellac are chosen for their specific refractive index and their ability to be reversed, a core principle of professional conservation.
- The subtle, rhythmic variations and sharp internal corners of hand-cut joinery create a ‘geometric harmony’ that sterile, machine-perfect joints lack.
Why Are Georgian Furniture Techniques Appearing in Cutting-Edge London Design Studios?
In an age of digital fabrication and mass production, a surprising trend has emerged in high-end design: a return to the painstaking methods of the 18th century. Leading design studios in London and beyond are increasingly commissioning or creating pieces that celebrate hand-cut joinery, planed surfaces, and traditional shellac finishes. This is not driven by nostalgia, but by a powerful search for authenticity, narrative, and unparalleled quality in a market saturated with the generic.
These techniques offer something that modern manufacturing cannot: a story. A hand-planed surface tells a story of the maker’s skill. A hand-cut dovetail tells a story of patience and precision. These marks of craftsmanship become the soul of the piece, transforming it from a mere object into a tangible connection to a tradition of excellence. For discerning clients, this narrative is the ultimate luxury. It provides a unique selling proposition that sets a piece apart from the sea of perfectly soulless, machine-made goods.
This resurgence proves that the principles of Georgian craftsmanship are timeless. They are not obsolete; they are simply demanding. By mastering the physics of light on wood, the chemistry of period finishes, and the geometry of hand-cut joints, you are not just replicating the past. You are aligning your work with a standard of quality that remains the benchmark for excellence and is once again being recognized as the pinnacle of design and craftsmanship.
Begin today to integrate these principles into your practice. Start not by building a new project, but by taking a piece of scrap wood and learning to create a single, perfect, light-reflecting surface with a hand plane. That is the first step toward closing the gap between your work and the masterpieces you admire.