
Many dedicated artists believe hitting a skill ceiling is a creative failure. The truth is often more physical. This plateau stems not from a lack of ideas, but from untrained neuro-muscular habits and a misunderstanding of how to practise. The solution lies in abandoning passive learning and adopting deliberate, biomechanically-sound exercises that rewire the hand-eye connection for true manual control and mastery.
You have dedicated years to your craft. You have sketched, painted, and sculpted with passion. You have consumed hundreds of hours of online tutorials, followed your favourite artists, and amassed a wealth of theoretical knowledge. Yet, something is wrong. Your progress has stalled. The fluid lines you envision become hesitant on the canvas. The subtle values you observe flatten in your rendering. This is the five-year plateau, a frustratingly common hurdle for dedicated self-taught artists. It feels like a wall, an invisible limit on your talent.
The common advice—to simply « practise more » or « find your style »—feels hollow, because you are already doing that. You suspect the issue is deeper, a foundational gap that no amount of inspiration can fill. You are correct. The problem isn’t a lack of creativity or dedication; it is a lack of specific, physical technique. The kind of skill that cannot be absorbed through a screen, but must be built into your very muscles and nerves.
This is where we must shift the conversation from the abstract to the physical. We will move beyond the notion of « talent » and into the realm of motor learning and biomechanics. The key to breaking your plateau is not in watching more, but in understanding how to train your hand as an athlete or a musician would. This guide will deconstruct the physical reasons behind your plateau, providing diagnostic tools to identify your specific weaknesses and a strategic framework for building the foundational skills that separate the proficient amateur from the master.
This article provides a structured path to deconstruct and overcome your technical plateau. We will explore the science behind skill acquisition, offer diagnostic exercises, and outline a clear strategy for deliberate practice. The following sections will guide you through this process.
Summary: The Artist’s Plateau: A Guide to Breaking Through with Deliberate Physical Practice
- Why Does Watching 100 Tutorials Never Match 10 Hours of Guided Brush Practice?
- How to Identify Whether Your Weak Point Is Pressure, Angle, or Speed?
- Atelier Residency vs Online Mentorship: Which Fixes Technique Faster for £1,500?
- The Grip Flaw That Causes Wrist Injury in 40% of Self-Taught Painters
- When to Focus on Line Work Versus Tonal Control in a Self-Study Year?
- How to Practise 15 Minutes Daily for Noticeably Steadier Lines in 8 Weeks?
- Why Does Hand-Cut Dovetailing Look Different from CNC-Routed Joints Even to Untrained Eyes?
- Why Do Your Fine Lines Wobble When Renaissance Masters Achieved Hairline Precision?
Why Does Watching 100 Tutorials Never Match 10 Hours of Guided Brush Practice?
The endless scroll of video tutorials promises a shortcut to mastery, but often delivers only a mirage of competence. The reason lies in a fundamental difference in how our brains learn. Watching a master painter is a form of passive learning. You are observing information, but your neural pathways for executing the skill remain dormant. In contrast, guided practice is a form of active learning, a process that forces your brain to engage, make mistakes, and build new connections.
Scientific research backs this distinction unequivocally. For instance, a meta-analysis from the Proceedings of the National Academy of Sciences shows that active learning increases exam performance by 6% on average compared to passive lectures. While 6% may seem modest, in the context of fine motor skills, this difference is monumental. It represents the gap between knowing the name of a technique and having the muscle memory to execute it flawlessly under pressure. Passive watching gives you a map; active practice makes you the cartographer, charting the territory within your own nervous system.
Case Study: The Brain on Active Learning
A study at the University of Illinois used fMRI scans to observe brain activity during learning. Participants who actively controlled their learning process showed significantly higher activity in the hippocampus—a region critical for memory formation. Their brains demonstrated enhanced coordination between the hippocampus, the prefrontal cortex (decision-making), and the cerebellum (motor control). This created more durable and accessible memory pathways. In short, their brains weren’t just storing a picture of the information; they were building the physical wiring to retrieve and use it. This is precisely what happens when you put down the tablet and pick up the brush with intention.
Every hour spent in deliberate, active practice—struggling with a line, correcting an angle, adjusting pressure—is an investment in building this robust neural architecture. An hour watching a tutorial is, at best, a fleeting visit to someone else’s completed palace.
How to Identify Whether Your Weak Point Is Pressure, Angle, or Speed?
Saying you have « poor brush control » is as unhelpful as a doctor diagnosing you with « feeling unwell. » True progress requires a precise diagnosis. For an artist, technical weaknesses almost always boil down to a failure in one of three core mechanical skills: pressure modulation, angle consistency, or speed control. These are not abstract concepts but physical, trainable actions. Before you can improve, you must identify your specific deficiency. A common mistake is to practise endlessly without knowing what you are trying to fix, effectively reinforcing your own errors.
Identifying your primary weakness requires isolating each variable. You must become a scientist in your own studio, conducting simple diagnostic tests to reveal where your hand-eye-brain connection is failing. The following exercises are not about creating a beautiful drawing; they are a clinical self-assessment. Approach them with an analytical mind, looking for symptoms of breakdown in your control. This is the first step in transforming your practice from aimless repetition to targeted, deliberate training.
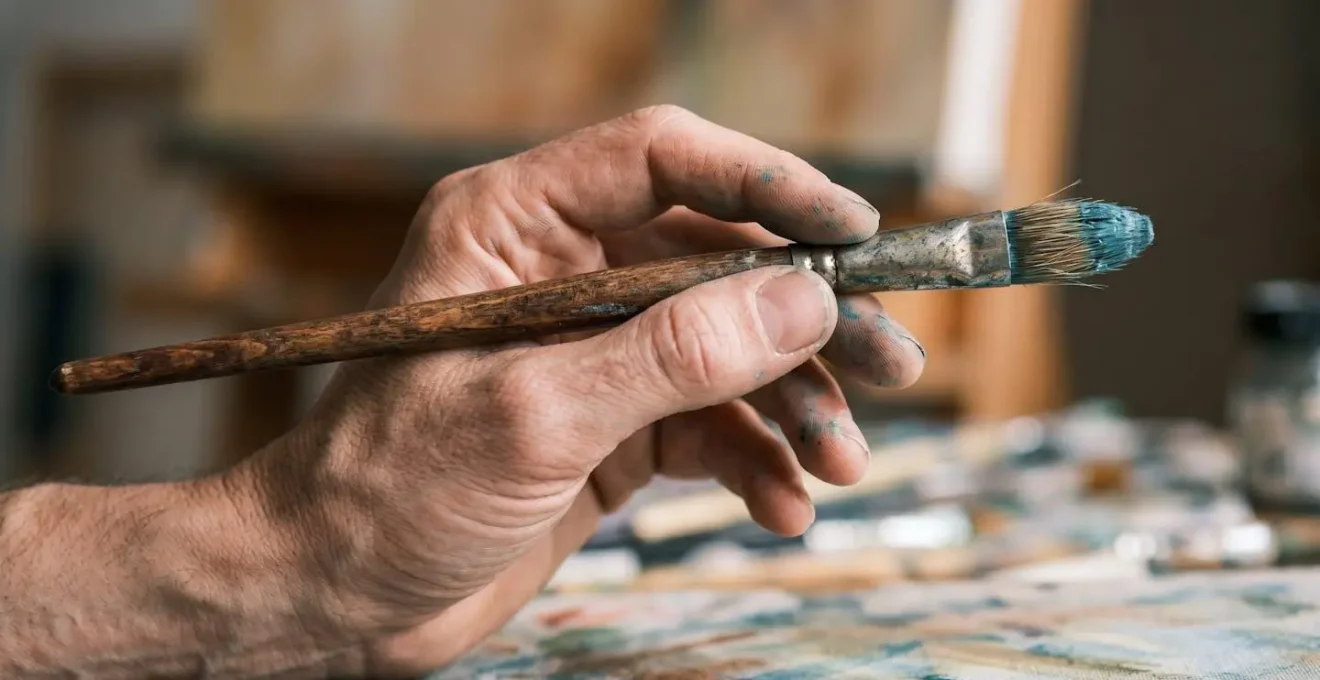
As this image demonstrates, the correct grip is the foundation of control. It allows for the subtle adjustments in pressure, angle, and speed that these exercises will test. Your goal is to make this conscious analysis of your movements second nature, improving your body’s innate sense of position, or proprioception.
Your Technical Self-Audit: 3 Diagnostic Drills
- The Pressure Test: Using a 2B pencil, draw a single continuous line that transitions from barely visible to the darkest black your pencil can produce, and then back to barely visible. The key is a smooth, seamless gradient. An abrupt « banding » or stepped transition reveals poor pressure modulation.
- The Angle Test: Draw a perfect circle using only your shoulder and elbow, keeping your wrist completely locked. Do not plant your hand; let it float above the paper. An oval or egg shape reveals an inability to maintain a consistent tool angle throughout a full range of motion.
- The Speed Test: Create a patch of parallel hatching lines. Start slowly, then gradually and smoothly increase your speed, all while maintaining perfectly even spacing and line weight. Inconsistent gaps or wavering, « wobbly » lines at higher speeds expose a deficiency in speed control.
Be honest in your assessment. The flaws you uncover here are not a judgement of your talent, but a clear, actionable roadmap for your practice sessions.
Atelier Residency vs Online Mentorship: Which Fixes Technique Faster for £1,500?
Once you’ve diagnosed your technical flaw, the next question is how to fix it. This is where you need targeted feedback from a trained eye. Friends and family mean well, but their feedback is emotionally biased and technically uninformed. You need input that is impartial and expert. This is where the concept of structured learning becomes critical. For a budget of around £1,500, two primary paths emerge: a short, intensive atelier residency or a longer-term online mentorship.
Choosing between them depends on understanding the type of knowledge you need to acquire. The challenge for any artist is transferring not just explicit knowledge (the « what, » like colour theory rules) but also tacit knowledge (the « how, » the intuitive, un-articulable feel of the craft). As one expert in skill transfer notes:
Training generally focuses on the transfer of important explicit knowledge, but the transfer of tacit knowledge presents a much greater challenge.
– Ed Hartin, From apprentice to master: the science, craft & art of incident command
An atelier residency excels at transmitting tacit knowledge. Being physically present, watching a master work, and receiving immediate, hands-on corrections provides a high-bandwidth transfer of information. You learn by osmosis and direct intervention. For £1,500, this might mean one or two weeks of immersive, focused training. It is a powerful but short-lived injection of expertise.
An online mentorship, conversely, offers a sustained, lower-bandwidth transfer over several months. It is excellent for accountability and structured feedback on your deliberate practice. Your mentor can review your diagnostic exercises, assign new drills, and guide your progress over time, ensuring you integrate the lessons. This path requires more self-discipline but builds habits over a longer period. For the same budget, you could secure 6-12 months of weekly or bi-weekly guidance. The choice is not about which is « better, » but which best suits your learning style and the urgency of your need for correction.
The Grip Flaw That Causes Wrist Injury in 40% of Self-Taught Painters
The pursuit of technical mastery is not without physical risk. A common and dangerous side effect of an improper grip is chronic wrist pain, a condition that can sideline an artist for weeks or even permanently. Many self-taught artists, in an effort to gain control for fine details, adopt a tight, cramped « writing grip, » relying on small finger and wrist movements. This method is a direct path to repetitive strain injury (RSI). It places enormous stress on the delicate tendons and nerves of the carpal tunnel.
This is not a minor issue; it’s a widespread occupational hazard. For example, a 2024 study published in the Journal of Health and Rehabilitation Research found that 59.3% of painters reported experiencing wrist pain, a staggering number that highlights the importance of proper biomechanics. The « death grip » not only limits your artistic range—preventing the fluid, expressive lines that come from using your arm and shoulder—but it also actively harms your body.
The correct approach is to hold the brush further back, using a lighter tripod grip, and to generate marks from the elbow and shoulder. This turns the arm into a larger, more stable lever system, creating steadier lines and relieving the wrist of undue strain. Protecting your body is not a luxury; it is a prerequisite for a long and sustainable artistic career. Integrating simple, preventative care into your daily routine is as crucial as cleaning your brushes.
- Wrist Extensor Stretch: Hold your arm straight out, palm down. With your opposite hand, gently bend your hand downward until a stretch is felt (not pain). Hold for 10-15 seconds, and repeat 3 times on each side.
- Wrist Flexor Stretch: With your arm straight out and palm up, use your other hand to bend your hand back until the stretch is felt. Hold for 10-15 seconds, and repeat 3 times per side.
- Fist Clenches: Make a tight fist, hold for 5 seconds, then spread your fingers as wide as possible. Repeat 10 times to improve circulation.
- Wrist Circles: Make slow, controlled circular motions with each wrist, performing 10 rotations clockwise and 10 counter-clockwise to maintain joint flexibility.
- Shake-Out Break: Every 30-45 minutes of work, take a moment to shake your hands vigorously for 10 seconds and rotate your shoulders. This prevents tension from building up during long sessions.
Ignoring pain is the fastest way to end your artistic journey. Listen to your body and treat your physical health as your most important artistic tool.
When to Focus on Line Work Versus Tonal Control in a Self-Study Year?
With a limited amount of practice time, the self-studying artist faces a critical strategic choice: should you dedicate your year to mastering confident, precise line work, or to developing a subtle, accurate command of tonal value? The answer is not to do both at once, but to prioritise based on the foundational principles of visual representation. The classical approach, time-tested in ateliers for centuries, provides a clear directive: master tonal control first.
Line is, in many ways, an artificial construct. In the real world, we perceive forms not through outlines, but through the relationship of light and shadow—through value. A mastery of tone allows you to render form, create atmosphere, and suggest volume with a sophistication that line alone cannot achieve. Focusing on line work too early can become a crutch, leading to flat, « coloured-in » images rather than fully realised, three-dimensional forms. By training your eye and hand to see and replicate values accurately, you are building the true foundation of realism.

Consider the challenge of painting a white egg on a white cloth, as depicted above. There are almost no discernible lines. The entire form is communicated through subtle shifts in tonal value. This is an extreme but powerful exercise in seeing the world as a painter does. This focus on targeted skill development is the essence of deliberate practice. As research on visual arts development confirms, general practice is insufficient; one must design specific activities to address identified weaknesses.
Therefore, a structured self-study year should begin with monochromatic exercises. Spend the first six months working exclusively in charcoal, graphite, or a single paint colour like burnt umber. Your goal is to create accurate value scales, to execute studies of simple forms like spheres and cubes, and to train your brain to deconstruct complex scenes into a mosaic of light and dark shapes. Once you have a confident command of tonal relationships, the introduction of confident line work and, eventually, colour will be built upon a rock-solid foundation, rather than a shaky one.
How to Practise 15 Minutes Daily for Noticeably Steadier Lines in 8 Weeks?
The idea of « deliberate practice » can sound intimidating, evoking images of gruelling, hours-long sessions. But the power of this method lies in its consistency and focus, not its duration. A mere 15 minutes of highly focused practice each day can produce more significant improvement in a skill like line control than hours of mindless sketching. The key is to isolate the skill and work on it with unwavering concentration.
For improving line steadiness, the goal is to train the larger muscles of your arm and shoulder to make the mark, overriding the twitchy, less reliable muscles in your fingers and wrist. This requires building new muscle memory, which is achieved through focused repetition. Here is a simple, 8-week daily program that takes only 15 minutes.
Weeks 1-2: The Floating Point. Tape a large sheet of paper to the wall at shoulder height. Your only goal for 15 minutes is to draw straight, parallel lines from one edge to the other using only your shoulder and a locked wrist. Do not worry about perfection. Focus only on the physical sensation of initiating the movement from your shoulder. This builds the initial pathway.
Weeks 3-4: Connecting the Dots. On the same large sheet, draw pairs of dots at random. Spend your 15 minutes connecting them with single, straight, unhesitating strokes. Vary the distance and angle. This drill trains your hand-eye coordination and targeting, teaching your arm to execute the path your eye sees.
Weeks 5-8: The Ghosting Method. This is the final and most crucial phase. Before you make a mark connecting two dots, « ghost » the movement in the air several times. Trace the intended path with your brush or pencil hovering just above the surface. This pre-programs the motor action. After three to five ghosts, commit to the line in one smooth motion. You will find your accuracy and confidence have increased dramatically. This method solidifies the muscle memory and makes the movement automatic.
This is not creative drawing; this is physical conditioning for your arm. By the end of 8 weeks, the wobble in your lines will have noticeably diminished because you will have re-wired your body to draw from a more stable, reliable source of movement.
Why Does Hand-Cut Dovetailing Look Different from CNC-Routed Joints Even to Untrained Eyes?
At the highest level of craft, whether in fine woodworking or oil painting, a certain quality emerges that transcends mere technical perfection. An observer can often feel the difference between a hand-cut dovetail joint and a CNC-milled one, even without knowing the technical specifics. The machine-made joint is perfect, its lines sterile and mathematically exact. The hand-made joint is also precise, but it possesses a subtle, almost imperceptible variation—a « life »—that speaks of the human hand that made it.
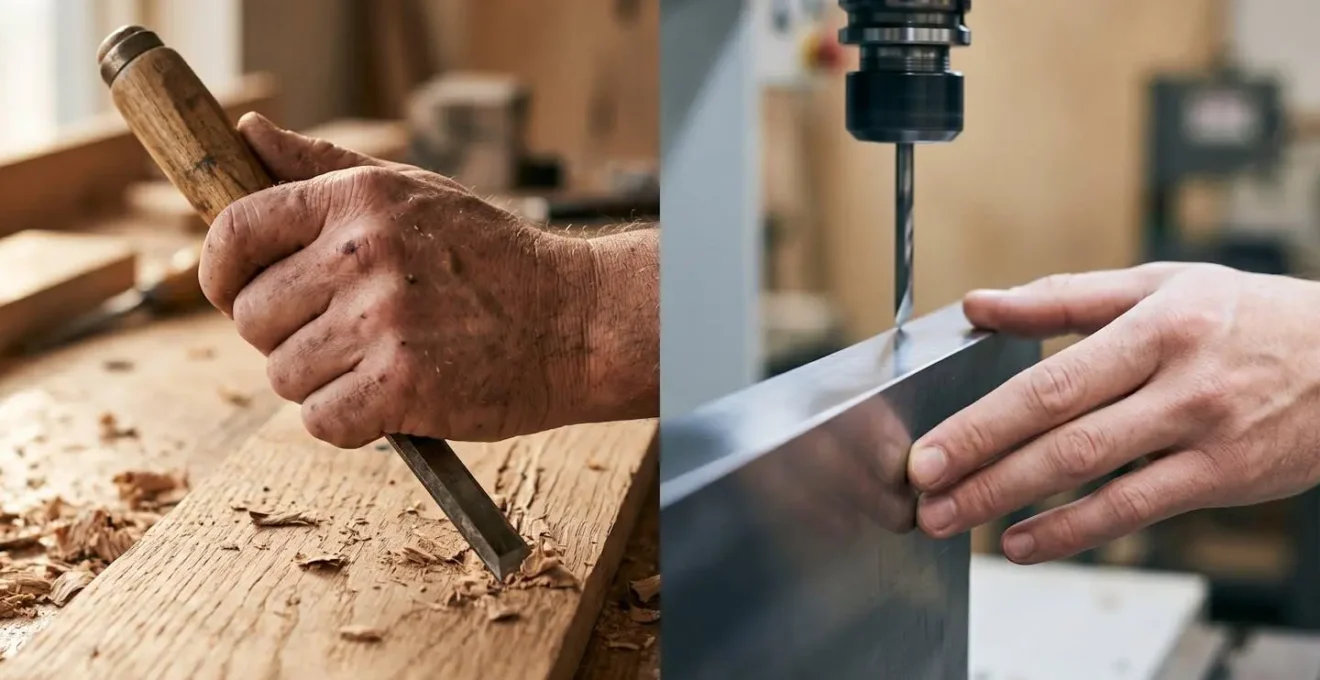
This difference is the physical manifestation of tacit knowledge. A CNC machine operates on explicit instructions—a codified set of coordinates and vectors. A master craftsperson operates on a lifetime of haptic feedback, proprioception, and accumulated, non-verbal understanding. As researchers in vocational studies describe it, « Tacit knowledge is often personal, contextual, and deeply rooted in the individual’s experiences, skills, and intuitions. »
The slight angle of a chisel, adjusted mid-cut in response to the feel of the wood grain; the minute hesitation in a brushstroke that gives a line its character—these are not errors. They are the record of a human mind making thousands of micro-decisions. This is what the untrained eye picks up on. It is not registering imperfection, but authenticity. It is the subtle rhythm and texture of a process guided by intuition, not by code.
This is the ultimate goal of breaking your plateau. It is not to become a human machine, capable of perfect, sterile reproduction. It is to train your body to be such a sensitive and responsive instrument that your own unique, intuitive, and tacit understanding of the world can flow through it and into your work. The wobbles of an untrained hand are noise; the subtle variations of a master’s hand are music.
Key Takeaways
- Artistic plateaus are physical, not creative, failures, solved by training motor skills, not just consuming theory.
- Progress requires abandoning passive tutorial watching in favour of active, deliberate practice that builds muscle memory.
- You must first diagnose your specific weakness—pressure, angle, or speed—before you can effectively treat it with targeted drills.
- True mastery lies in acquiring ‘tacit knowledge’, the intuitive feel of the craft, which can only be learned through guided doing and feedback.
Why Do Your Fine Lines Wobble When Renaissance Masters Achieved Hairline Precision?
We arrive back at the core frustration: the trembling hand, the wobbly line that betrays your intention. It is tempting to look at the hairline precision of a Renaissance master and attribute it to a lost secret or a level of « talent » that is simply unattainable. But this is a myth. The masters were not gifted with magically steady hands; they were products of a rigorous, physically demanding apprenticeship system that we can learn from. Their stability came from the very principles of motor learning we have discussed: training the large muscles of the arm and shoulder, understanding biomechanics, and engaging in thousands of hours of deliberate practice.
The wobble in your line is the visible evidence of an untrained motor pathway. It is the result of relying on small, twitchy muscles in the fingers and wrist instead of the stable, powerful lever of your entire arm. It is the consequence of passive learning over active doing. The path to a steady hand is paved with mistakes made during practice. Research in motor learning confirms this counter-intuitive truth:
Passive guidance is less effective for learning than active involvement, despite the latter condition typically making more performance errors during training.
– Multiple researchers in motor learning, Learning versus Performance: New Conceptualizations of Practice
Your wobbles and errors are not signs of failure. They are essential data points in your brain’s process of building a new skill. Each mistake, when consciously corrected, strengthens the correct neural pathway. The Renaissance apprentice did not fear a wobbly line; their master used it as a diagnostic tool to guide their practice. You must learn to do the same.
The solution is to embrace a new mindset. Stop being a passive consumer of content and become an active practitioner of physical drills. Stop seeing your body as a simple tool and start seeing it as an instrument to be tuned and trained. The stability you seek is not a gift to be wished for, but a skill to be built, one deliberate, focused movement at a time.
Your next step is to stop reading and start doing. Take the diagnostic tests, identify your weakness, and commit to just 15 minutes of deliberate practice today. This is how you begin to dismantle your plateau, not by thinking your way through it, but by physically working your way over it.