The leap from a skilled street artist to a commissioned muralist isn’t about artistic talent—it’s about mastering a new set of disciplines. The flaws in your large-scale work don’t come from a shaky hand, but from a misunderstanding of perceptual physics, material science, and operational logistics. This guide deconstructs the professional systems that turn a good sketch into an awe-inspiring landmark.
You’ve nailed the sketch. In your book, it’s perfect—the composition is balanced, the lines are clean, the concept is powerful. You spend hours, or even days, transferring it to a 20-metre wall, only to step back and feel a sinking disappointment. The proportions are slightly off, the energy is lost, and it just… looks amateur. It’s a frustratingly common experience for talented artists aiming to transition from local spots to significant, commissioned urban projects. The instinct is to blame your drawing skills or the transfer method, often leading down a rabbit hole of advice about grids and projectors.
While techniques like gridding or using digital projections are part of the toolkit, they are merely tools, not the entire system. The real gap between an amateur wall and a professional, building-sized mural lies in a fundamental shift in thinking. The world’s leading muralists don’t just paint bigger; they operate as a synthesis of an artist, an engineer, a chemist, and a project manager. They understand that a wall is not a flat canvas. It’s a complex architectural surface subject to the laws of perceptual distortion, material science, and contractual obligations.
But what if the key to unlocking monumental scale wasn’t about perfecting your scaling technique, but about mastering the professional systems that support it? What if the secret was less about the art and more about the operation? This is the core difference. It’s the mastery of factors you can’t see in the final photograph: the choice of primer, the access strategy, the contractual foresight, and the design that accounts for a viewer’s movement in three-dimensional space.
This guide will deconstruct these professional secrets. We will move beyond the basics of scaling and delve into the critical operational decisions that determine whether a mural commands its environment or gets lost in it. By understanding these principles, you can bridge the gap and begin creating work with the impact and longevity of an internationally commissioned piece.
Summary: Mastering the Craft of Monumental Murals
- Why Does Your Sketch Look Perfect but the 20-Metre Version Looks Proportionally Wrong?
- How to Complete a Building-Sized Mural in 5 Days Without Weather Disasters?
- Cherry Picker vs Abseil: Which Provides Better Control for Complex Mural Details?
- The Primer Choice That Made a £15,000 Mural Flake Off Within One Winter
- When to Negotiate Restoration Rights: Before Contract Signing or After Completion?
- How to Design a Sculpture That Rewards 360-Degree Viewing Without Weak Sides?
- Flats and Paint vs Projections: Which Creates More Impact for £15,000?
- Why Does Your Sculpture Look Impressive from One Angle but Collapse from Others?
Why Does Your Sketch Look Perfect but the 20-Metre Version Looks Proportionally Wrong?
The most common frustration in scaling up is battling perceptual distortion. A sketch is a 2D object viewed from a single, controlled distance. A mural on a building is a 3D feature experienced from infinite, uncontrolled viewing angles. The lines that look straight from 50 metres away will appear curved up close. This phenomenon, known as parallax and foreshortening, means a direct, mathematical scaling of your sketch will almost always fail. The top of the mural is physically further from the viewer on the street than the bottom, requiring a subtle, non-linear compensation in your design.
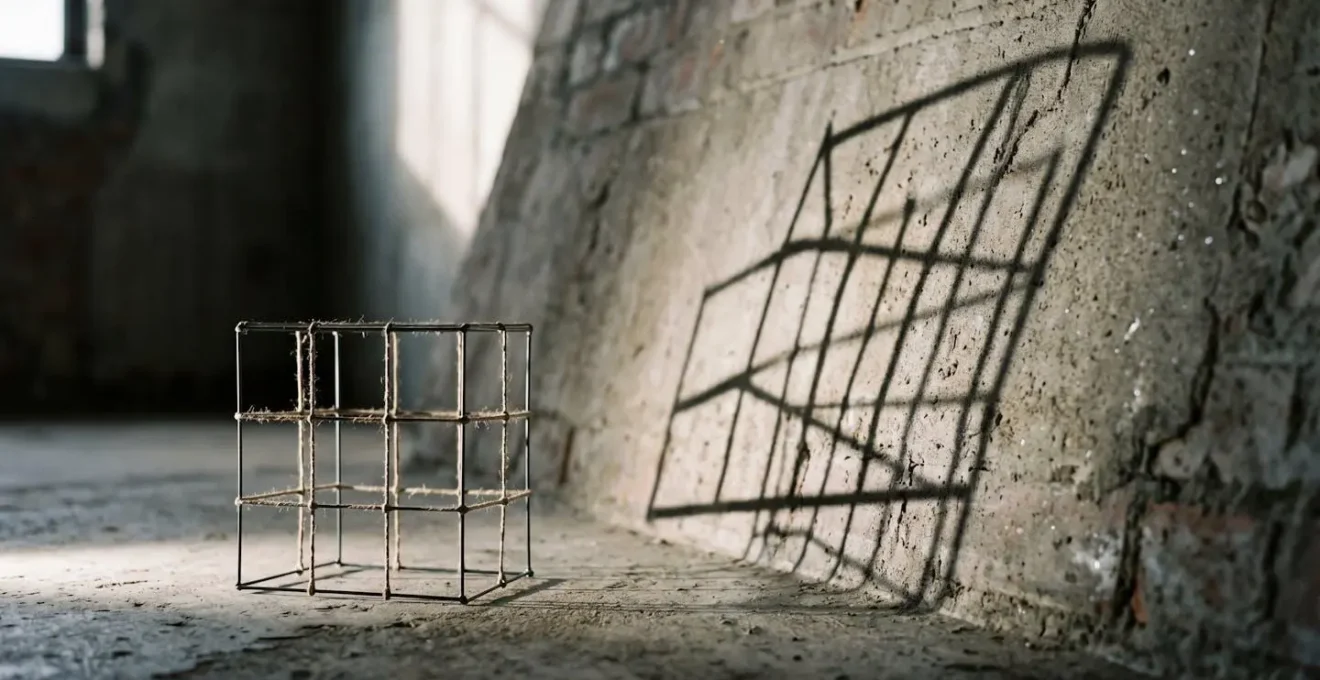
As the image above conceptually illustrates, what is a perfect grid in one plane becomes distorted when projected onto another. Professional muralists don’t just scale; they pre-distort their master design. They anticipate the viewer’s most likely position and « bend » the artwork in the digital file to counteract the perspective shift. This might mean elongating the upper elements of a design so that they appear correct from ground level. It’s a counter-intuitive process that trades sketchbook accuracy for real-world perceptual accuracy, a hallmark of mastering scale.
How to Complete a Building-Sized Mural in 5 Days Without Weather Disasters?
Completing a massive mural on a tight deadline isn’t about painting faster; it’s about superior operational logistics. Amateurs think linearly: sketch, prep, paint, finish. Professionals think in modular, parallel workflows. They deconstruct the project into independent components that can be executed simultaneously by a team. While one person preps and primes the upper section, another can be laying down base colours on a lower, already-prepped area.
This systematic approach requires meticulous planning before anyone even touches the wall. It involves creating a colour-coded map of the mural, delegating specific sections or colour layers to team members, and having robust weather contingencies. A professional plan includes « rain-day » tasks, such as pre-mixing colours or organising equipment, ensuring that no time is lost. This level of organisation transforms the project from an artistic endeavour into a well-oiled production.
Case Study: IPAF 2019 Festival Artists Complete 23 Large-Scale Murals in 9 Days
During the International Public Art Festival 2019 in Cape Town, 23 artists completed massive public murals in just nine days. This feat was only possible through highly structured workflows. The festival demonstrated how professional muralists use team-based prep and detail delegation to manage tight deadlines effectively. Artists employed modular painting strategies, breaking down immense walls into manageable zones, which is an essential collaborative workflow for completing building-sized works within compressed timeframes, as detailed in the festival’s coverage.
Ultimately, speed at scale is a function of system, not individual velocity. It’s about maximising every hour through delegation and having a plan so thorough that it can absorb unforeseen delays without derailing the entire project.
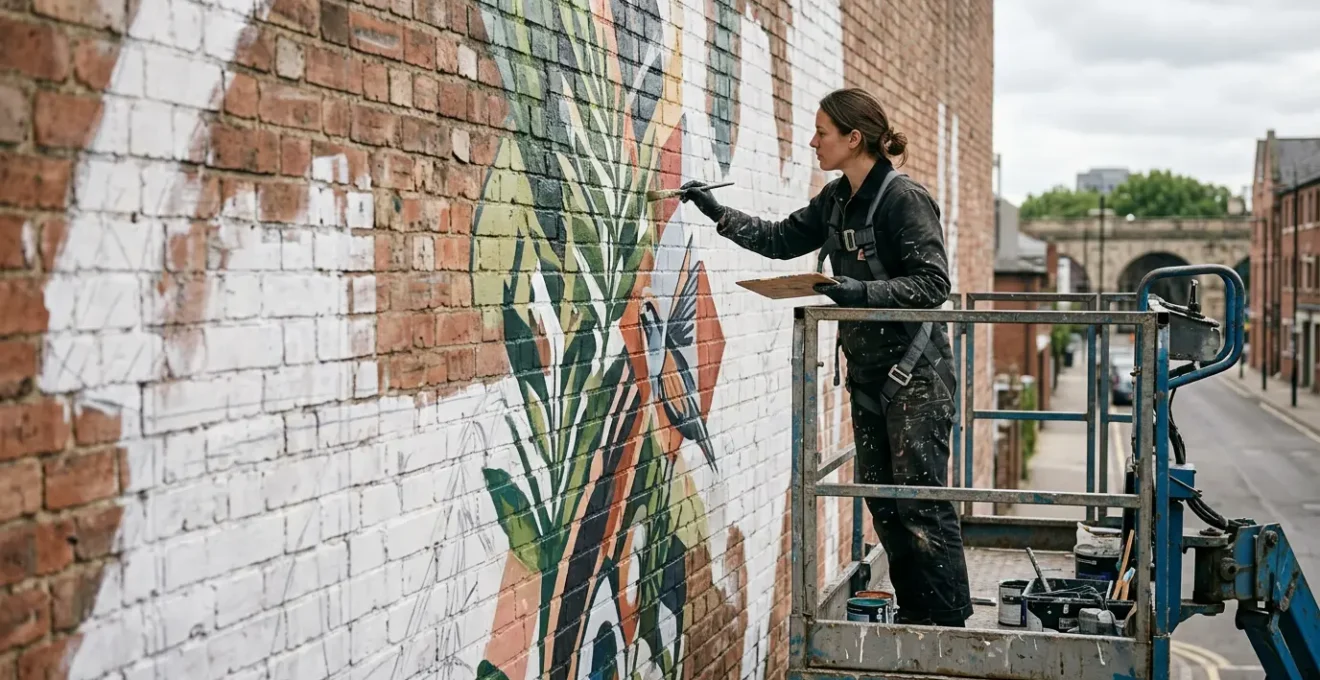
Cherry Picker vs Abseil: Which Provides Better Control for Complex Mural Details?
Your « access strategy » is as crucial to the final look of your mural as your paint choice. It’s not just about reaching the wall; it’s about the stability and movement quality your platform provides. The two primary methods, powered access platforms (like cherry pickers) and industrial rope access (abseiling), offer fundamentally different working experiences. The choice dictates the type of detail and brushwork you can realistically achieve.
A cherry picker, or boom lift, provides a stable, independent platform. It allows for a relaxed posture and the use of both hands, making it ideal for methodical, high-detail work like photorealism or intricate line work. However, it can be cumbersome to reposition and has a limited reach over obstacles. Abseiling offers unparalleled access to difficult facades and corners but requires constant body tension and one-handed work, favouring bold, gestural strokes over fine detail. Your artistic style must inform your access choice, not the other way around.
The distinction is so critical that professional certifications are separated. As outlined in an overview of IPAF training standards, the certification for a vertical scissor lift (Category 3A) is different from that for a boom platform (Category 3B). This underscores that they are distinct tools for different jobs.
| Factor | Category 3A (Scissor Lifts) | Category 3B (Boom Platforms) |
|---|---|---|
| Movement Type | Vertical platforms, can be driven while elevated | Articulated or telescopic booms (cherry pickers) |
| Stability | Highly stable platform, minimal sway | More movement, requires counterbalancing |
| Best For | Photorealism and detail work requiring steady hand | Gestural work, accessing difficult angles, 3D movement |
| Reach Flexibility | Limited to vertical movement | Extended horizontal and vertical reach, ideal for curved facades |
| Certification | IPAF 3A required | IPAF 3B required (separate from 3A) |
The Primer Choice That Made a £15,000 Mural Flake Off Within One Winter
No artistic masterpiece can survive a substrate that rejects it. The single most common point of large-scale mural failure is not the topcoat of paint but the primer—or lack thereof. An amateur sees a wall; a professional sees a complex, porous substrate with its own pH level, moisture content, and texture. Applying standard interior/exterior paint directly onto untreated brick or concrete is a recipe for disaster. Moisture trapped within the masonry will push outwards, causing catastrophic peeling and delamination.
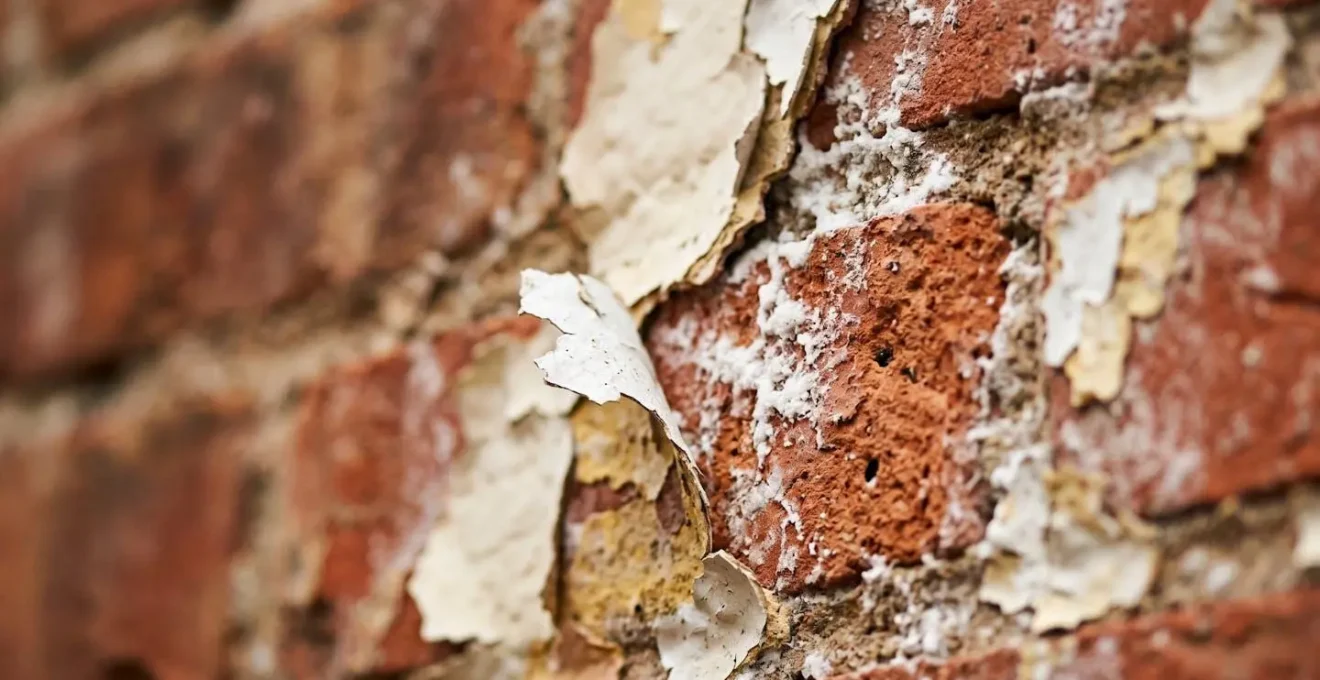
The key is understanding material science. Masonry needs to « breathe. » A proper masonry primer is formulated to bond with the alkaline surface while allowing moisture vapour to escape. As experts in the field, Golden Artist Colors state, this is a critical factor for longevity.
Breathability is important to the successful adhesion of acrylic products. If a mural encompasses an entire wall made of a masonry product, it is advisable to apply thin coats of MSA Varnish. If this is not done, it may lead to premature adhesion failure.
– Golden Artist Colors, Just Paint – Mural Painting Technical Guidance
This principle is non-negotiable. According to professional mural painting guidelines from Liquitex, a gallon of medium viscosity acrylic may cover up to 400 square feet, but this rate is significantly reduced on rough, unprimed surfaces, affecting both budget and adhesion.
Case Study: Professional Wall Preparation Protocol to Prevent Mural Failure
The Greetings Tour, a duo of professional postcard mural artists, follows a strict wall preparation protocol that begins a week before painting. Their process involves pressure washing, cleaning with TSP, repairing all structural issues with appropriate curing time, and crucially, applying a high-quality masonry-specific primer like Sherwin Williams’ LOXON. They spray and then back-roll the primer with a thick nap to force it into every groove. This systematic approach is what prevents the costly failures that plague artists who cut corners on preparation.
Your Pre-Mural Wall Integrity Audit
- Surface Analysis: Identify the substrate (brick, concrete, stucco). Test its porosity by flicking water on it—does it absorb quickly or bead up? Check for chalkiness or previous coatings.
- Moisture & Damage Check: Inspect the entire wall for cracks, efflorescence (white salty deposits), and signs of water damage, especially around gutters and ground level.
- Structural Integrity: Tap the surface to listen for hollow sounds that indicate delamination of a previous coating. Press on any bubbling paint to check the extent of the failure.
- Cleaning & Repair Plan: Based on the analysis, determine the necessary steps: pressure washing, fungicide treatment, crack repair with elastomeric patch, and required curing times.
- Primer Selection: Choose a primer specifically designed for your substrate (e.g., masonry conditioner for chalky surfaces, stain-blocking for graffiti, high-adhesion for glossy surfaces).
When to Negotiate Restoration Rights: Before Contract Signing or After Completion?
An amateur thinks about getting paid for the job. A professional thinks about the entire lifecycle of the artwork, including its potential destruction. The moment your art is on someone else’s property, you enter a complex legal domain of intellectual property and moral rights. Moral rights, which include the right of integrity (preventing distortion or destruction) and the right of attribution, are the artist’s protection against their work being disrespected. Waiting until after the mural is complete to discuss these is a catastrophic mistake.
Restoration rights, maintenance schedules, and clauses about future construction or demolition must be explicitly defined in the contract before you begin. Will you be given the first right to restore the mural if it’s damaged? What is the guaranteed lifespan of the mural before the owner can paint over it? If the building is sold, do your rights transfer? These are not afterthoughts; they are core business negotiations that protect your artistic legacy and financial interests.
Case Study: Bachand v Mural: Contractual Gap Leads to Artist Rights Violation
A Canadian court case highlights this danger perfectly. An artist discovered his Montreal mural was completely hidden by new construction years after completion. The intermediary organisation had failed to align the contract with the property owner (which only guaranteed a 1-year display) with the contract they gave the artist (which promised full IP rights). The court found the intermediary liable for moral rights infringement because they « promised more rights than they had obtained. » This case demonstrates with painful clarity why all clauses, especially those concerning the work’s future, must be negotiated and transparently disclosed before the contract is signed.
Your contract is the single most important tool for ensuring your art is treated with respect long after you’ve packed up your brushes. Ignoring it is leaving your legacy to chance.
How to Design a Sculpture That Rewards 360-Degree Viewing Without Weak Sides?
While a mural is not a freestanding sculpture, the principle of 360-degree composition is directly applicable and often ignored. Your wall is not a flat canvas in a gallery; it exists in a dynamic urban environment. People will view it while walking past, from across the street, from an adjacent building, or from a moving vehicle. Designing for a single, « perfect » photographic angle—the classic Instagram shot—creates a one-dimensional experience and is a hallmark of amateur work.
A professional muralist considers the entire viewer’s journey. How does the composition unfold as someone approaches? Is there a « weak side » where the design falls apart? Great murals often wrap around corners, integrating architectural features like windows or pipes into the composition itself. This creates a sense of discovery and forces the viewer to move around the space, engaging with both the art and the architecture. The mural becomes an environmental experience, not just a picture on a wall.
Think about leading lines that don’t just exist within the frame, but that guide the eye around the building. Consider how the mural’s narrative or abstract flow can be maintained across different planes. This approach elevates the work from a mere decoration to a true piece of public, environmental art that rewards exploration from every possible angle.
Flats and Paint vs Projections: Which Creates More Impact for £15,000?
With a significant budget like £15,000, you have strategic choices that go beyond traditional painting. One powerful alternative is projection mapping. The decision between a permanent painted mural and an ephemeral projection event is not about which is « better, » but about the desired economic and social impact. Each delivers a different kind of value for a similar investment.
A painted mural offers longevity. It becomes a local landmark, a permanent fixture in the community’s identity, generating sustained, long-term social media appeal and foot traffic. A projection mapping event, by contrast, is an ephemeral spectacle. Its value lies in its intense, short-term viral potential. It creates a « you had to be there » moment, perfect for a specific launch or festival, generating a huge spike of online engagement within a very narrow window.
The budget allocation for each is surprisingly similar, but the line items differ drastically. A painted mural’s costs are dominated by artist labour, physical materials, and prolonged access equipment hire. A projection event’s costs are focused on high-lumen projector rental, specialist technician fees, and temporary event permits. This breakdown of costs is essential for pitching the right solution to a client.
| Cost Factor | Painted Mural | Projection Mapping |
|---|---|---|
| Labor/Talent | 5-10 days artist rates (£3,000-£5,000) | 1-2 nights projectionist fees (£1,500-£2,500) |
| Materials/Equipment | Professional paint, primers, sealants (£1,500-£2,500) | High-lumen projector rental (£2,000-£4,000) |
| Access Equipment | IPAF-certified scissor lift/boom hire (£2,000-£3,500) | Power supply, AV setup, rigging (£1,500-£2,500) |
| Permits & Permissions | Minimal for permanent installation (£200-£500) | Light-spill regulations, temporary event permits (£1,000-£2,000) |
| Longevity | 5-15+ years with maintenance | One-time event (ephemeral) |
| Social Media Impact | Sustained local landmark appeal | High virality during event window |
| Total Estimated | £8,000-£12,500 | £8,000-£13,000 |
As a professional, your role is to advise the client on which form of impact best serves their goals—permanent place-making or a temporary viral burst.
Key takeaways
- Perception over Proportion: Professionals don’t just scale; they pre-distort designs to compensate for how the human eye perceives objects on a massive, angled surface.
- System over Speed: Fast completion of large murals comes from modular planning, team delegation, and robust contingencies, not just painting quickly.
- Material Science is Non-Negotiable: The longevity of a mural is determined by the chemical bond between the primer and the substrate, not just the quality of the topcoat paint.
Why Does Your Sculpture Look Impressive from One Angle but Collapse from Others?
This is the ultimate test of scale-mastery. A mural can look perfect from your working position on the cherry picker, only to have its composition completely fall apart from street level. The reason is a failure to design for the « big picture. » Working for hours on a small section of a massive piece creates a form of tunnel vision. You lose perspective of how your detailed work integrates into the whole.
Take a step back from your mural every 15 or 20 minutes to see how it’s all shaping up. When you’re working on art that’s bigger than your body it’s easy to miss mistakes until late in the game. Check the big picture regularly so you can adjust as you go.
– Hom Sweet Hom, How to Transfer Your Mural Design to a Wall
This simple discipline is a crucial professional habit. It’s the physical act of constantly shifting your perspective from micro-detail to macro-composition. It allows you to catch proportional errors, colour imbalances, and compositional weaknesses early. This regular « reset » of your viewpoint is the only way to ensure the powerful image in your mind is what actually materialises on the wall, holding its own not just up close, but from every critical vantage point.
Ultimately, a successful mural is not one that is perfectly drawn, but one that is holistically composed for its environment. It’s an artwork that holds its integrity from 2 feet away and 200 feet away, a testament to an artist who has mastered not just their craft, but the very act of perception.
To elevate your work to a professional standard, you must begin implementing these systems. Start by treating your next project not as a single piece of art, but as a multi-faceted operation encompassing design, material science, logistics, and legal foresight.